Browsing Tag

How To

Q & Advice

Wedding Invitation Wording: What to say

This is the third in a multi-part series. We hope you find the advice in this series helpful as you navigate the world of Save the Date cards, wedding invitations, and wedding websites!

The time to finalize RSVP wording and send out wedding invitations is fast approaching – eek! Although you’ve likely sent Save the Date cards, giving your guests plenty of notice on the final wedding details helps them to cement their plans. If any of your are traveling to your wedding, they may need extra time to prepare, so don’t feel pressured into waiting to send those invitations out!

Your wedding invitation design is definitely important. However, your wedding invitation wording also sets the tone of your celebration, while giving guests important information about the who, what, when, where and how.

Glosite online wedding invitation wording

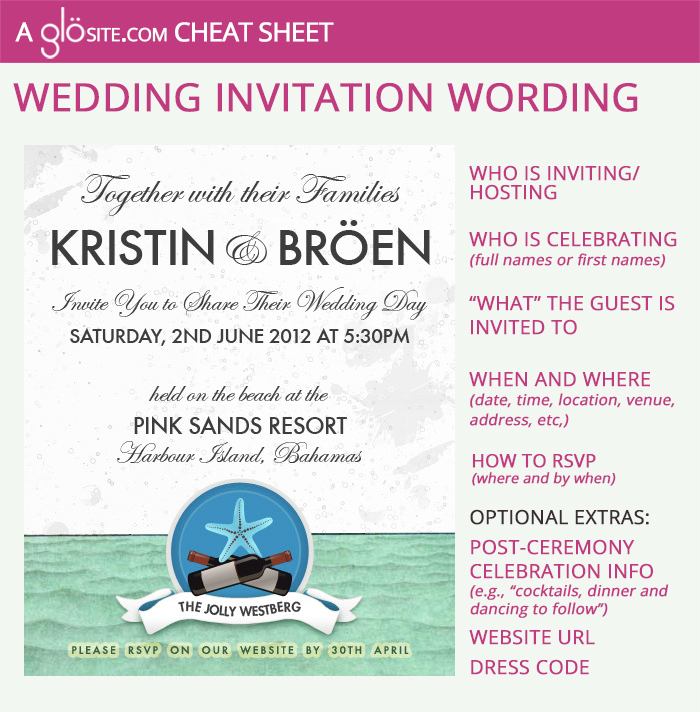
Kristin and Bröen captured the beachy vibe of their destination wedding with their wedding invitation wording – see the live version here. They honor all the people who made the day happen—showcased by “together with their families. Their intentional choice of the words “held on the beach” subtly tells guests the dress code is beach-appropriate clothing and footwear. Because their online wedding invitation linked directly to their wedding website, they did not need to include a specific URL.

Whatever your style, there are a few elements that you’ll definitely want to include in your wedding invitation wording:

Who is inviting or hosting the celebration – in the past, this was traditionally the bride’s parent’s names, but in the modern-world, this can include any combination of hosts – parents, step-parents, grandparents, guardians. If there are too many to mention by name on the actual invitation or if the couple is hosting, something as simple as “Together with their families” or “With great joy, we invite you…” is a lovely way to begin

What the guest is being invited to: for example, “Witness/Share in/ Celebrate the marriage of..,” “As s/he weds,” “Share in their happiness on the top of a mountain as Jane marries Casey” – you get the idea.

Who is getting married / celebrating – this is traditionally each person’s first and last name, but using first names only can also set a wonderfully intimate tone

Where and when - Date(s), time(s), & location so that each guest knows exactly where to gather and what time to be there

How to RSVP – be specific with guests about how (on your website? by email? by reply card?) they should RSVP and when you need to hear from them

Extra (optional) information can include:

Details about any post ceremony celebrations – e.g., “Reception to follow,” or “Dinner and Dancing to follow,” or “Please join us for cocktails after the ceremony” or “party to follow at Studio 18 starting at 7pm.”

Wedding website URL – so guests know where to find more information and potentially RSVP

Dress code - no one likes to be under (or uncomfortably) dressed! This information is particularly important if there are special considerations like dressing warmly for an outdoor ceremony or wearing shoes that are appropriate for sand/grass

If you run out of space for these extra invitation wording details, your wedding website is a great place for all of the spill-over. In addition to the extra information mentioned above, your website may also contain a basic schedule of the day/weekend/week (when the reception or after-party begins, and when certain activities are planned), FAQs (like whether or not children are invited), accommodation suggestions and more information that guest will find helpful, useful and fun. [what to include on a wedding website post] If you are sticking with traditional paper invitations only – then inclusion cards give extra space for all the details.

Jenny and Alan's glosite online wedding invitations design

glosite wedding website events

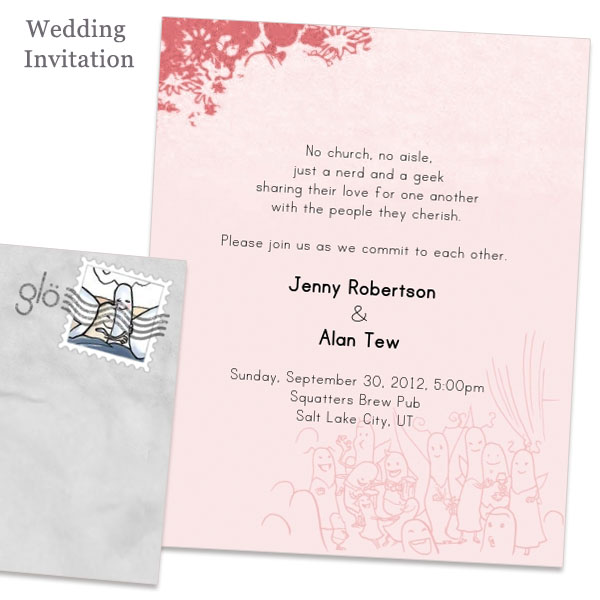
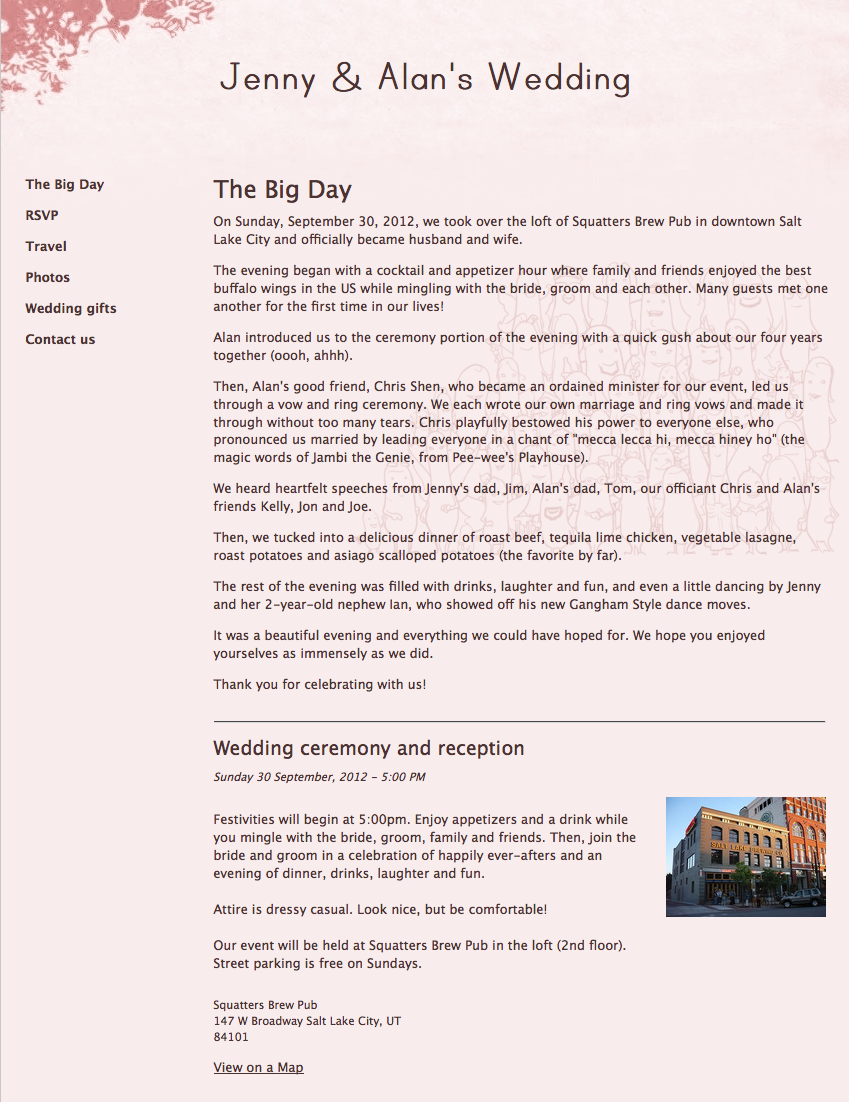
Jenny and Alan used their online wedding invitation wording to set the tone – and included all of the extra details on their wedding website. See more photos and details about their casual brewpub wedding (there were wooden rings and a magic wand – squeee!)

Your wedding website is also the perfect place to collect online RSVPs. However, if you’re sending printed invitations and requesting snail-mail RSVPs, be sure to include your RSVP cards and self-addressed, stamped envelopes that guests can mail back to you within the wedding invitation envelope.

Invitations can embody a wide range of themes. They also give guests an early idea of what to expect at your ceremony and celebration, especially if you’ve been planning for awhile now and know how the event will look and feel. If calligraphy or traditional wording aren’t your style, there are all kinds of ways to mix things up.

glovite online wedding invitation wording

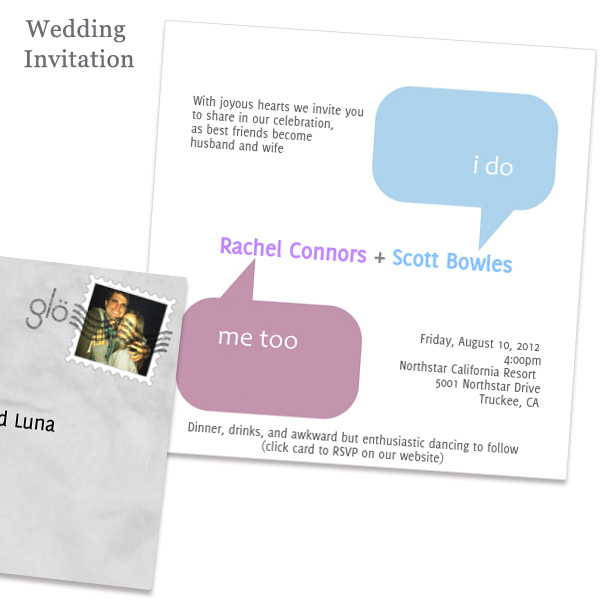
There’s not much about Rachel and Scott’s wedding invitation wording that guest’s wouldn’t love. This invite sets the tone for a celebration that everyone will want to attend, regardless of their dance skills.

Whether your special event will be traditional, silvery, and whimsical or informal, laughter-filled, and raucous (or both!), your wedding invitations can reflect that through aesthetics and language. Don’t be afraid to break with tradition if something doesn’t meet your needs.

Want more invitation inspiration? Check out some of our designs or visit our complete guide to wedding invitations!

Read Part 1 of this miniseries, which covers Save the Dates.
Read Part 2 of this miniseries, which covers RSVP wording.
Read Part 4 of this miniseries, which covers addressing invitations.
Read Part 5 of this miniseries, which covers the invitation “host line.”

Inspiration, Spice up your Site

Add a flickr slideshow or photo to your wedding website

Add a flickr slideshow

A flickr slideshow on my Glösite

I’ve written before about adding a Picasa slideshow to your Glö wedding website, but I know that lots of you also use flickr to store all of your fabulous photos. We don’t like anyone to feel left out, so here’s a similar tutorial on how to add a flickr slideshow to your Glösite.

This “how to” will focus on adding a slideshow of a particular album I have on flickr, but the same principle applies to adding a slideshow of your photostream or an individual photo.


1) Go to your flickr account and on your photostream, set or album you’d like to add, click on an individual photo. 

2) Click on the three dots in the bottom-right corner and choose “View Slideshow” from the pop-up menu

3) This takes you to a black page with your slideshow or photo in the middle. Click on “Share” in the top-right corner of this page

Click share
4) You can either select the code from the “Grab HTML code” box or else you can click on “customize HTML code” below to change the size of your slideshow

Copy code
4b) If you click on “customize HTML code” make your selections (I like the medium size for Glösites) and copy the new embed code

copy code
5) Go back to glosite.com and navigate to the “edit” page for the page on your wedding website where you’d like to add the slideshow (Manage Glösite > Manage Pages > edit)
Scroll down to the widget box at the bottom of the page and paste in the code, or else you can use the HTML button on the text editor to add the slideshow to the middle of your page

paste code7) Save the page and view on your Glosite

View on Glosite

Inspiration, Spice up your Site

Adding a facebook badge to your wedding website

Do you pretty much live on Facebook? Me too. Want lots of people to like you? Me too!

Here are the steps you can take to add a facebook badge to the “Contact Us” page on your Glö wedding website

1) Go to facebook and view your profile

Facebook profile

2) Scroll to the bottom of the left column and click on “Add a badge to your site”

Add a Facebook badge


3) Click on “Edit This Badge”

Edit Badge

4) Customize what you’d like to have on your badge and click ‘Save’

Customize your badge


5) Click on “other”, then highlight and copy the code below

Copy badge code

6) go to glosite.com > “Manage Glösite” > “Edit pages” and click on “edit” for your Contact Us page
Scroll to the bottom and paste the code into the widget box or else use the HTML button to paste the code into the text area of your page.
Then click “save page”

Paste in badge code

7) View your Glösite and see how it looks!

View badge on your glosite


Inspiration, Spice up your Site

Adding a Picasa slideshow to your Glosite

UPDATE: Now that Picasa is linked to Google+, some of the features have changed slightly. The directions below are still valid if you work via the old Picasa web interface, which you can find but cutting and pasting the original link into your browser: https://picasaweb.google.com/home

I’ve had a few questions lately about how to add a Picasa slideshow to one of your Glösite pages. In case others are wondering the same thing, here’s a quick video that should help. (for some reason, the video appears to go faster than the recording, but I hope it’s close enough to make sense!)

To recap, the key steps are:
1) Ensure your album (or image) has the right visibility settings: Either Public or Visible to anyone with the link
2) grab the embed code from the lower-right side of the picasa page for that album or image
3) Paste the embed code onto your Glösite page – either into the widget box or using the “html” button of the text editor
4) Save your page, and view!

Inspiration, Spice up your Site

Adding a forum for conversation to your wedding website

Your wedding website is a great way to build a connection with your guests, but what about when your guests want to connect with one another? As we say around Glö HQ – there’s a widget for that! In this case, the widget is a forum.

A forum is a perfect way to facilitated conversations between guests who may not know one another, be friends on facebook, etc. It’s perfect for organizing rides from the airport, spare beds in hotel rooms, and other travel logistics.

One forum provider who appears popular with Glö-bies is Nabble. With a few steps, you can get a forum up, running and embedded onto a page in your Glösite. Here’s a quick overview:

1) sign up for a Nabble (or another forum) account

Step 1: sign up

2) Customize appearance, etc.

Step 2: Customize

3) Grab the embed code

Step 3 - Grab embed code

4) On your Glösite – choose a page where you’d like to add your forum. Click on the “html” button on the text editor and paste in the code, or paste the code in to the widget box at the bottom of the page. Save

Step 4: Add to Glösite

5) Enjoy your forum!

Step 5: Enjoy!

Inspiration, Spice up your Site

Tweet Tweet glosite background

Do you know that you can use most twitter background with your Glösite? There are tons of free twitter background available on the web – giving endless Glösite design possibilities. Love that!

Here’s an adorable example I found on Free Twitter Skins – this one is called Winged Messenger. I uploaded the twitter design as the Glösite “background image” – anchored left. And then chose an existing Glö design for the “page design.” I think it’s a perfect match! Are ya diggin’ it?

Example Glosite

Inspiration, Spice up your Site

Custom HTML on Glösite pages – did ‘ya know?

We recently asked several Glöbies to fill out a survey to help us understand what you think about Glö and how we can improve. One comment I saw was a request for custom HTML on Glösite pages. The person didn’t leave their name, so I thought I’d just broadcast to everyone to let you know that this is possible! Using the HTML function, you can add photos, widgets, text, etc anywhere within the Glösite page. If the idea of HTML totally scares you, you can also continue to paste in widgets in the “widget box” – these will simply appear at the bottom of the page.

Let’s go through a quick step-by-step using a PacMan widget that I found on Widgetbox (My total go-to source for fun widgets!)

Go to ‘Manage Glövites’ > edit page and scroll down to the text box area. Here you’ll find a button labeled HTML.


Click that bad-boy and another window will pop open.

Now, flip over to the browser window with the widget you’re coveting and click ‘get widget’

A box will pop up with the code you need to capture, so click ‘copy’

Now, flip back to the browser window with glosite.com open on it (if the HTML box has gone away, you might need to click the HTML button again.) Put your cursor inside the widget box and paste in the code you just copied, then click ‘update”

Scroll to the bottom of the Edit Glövite page and click ‘Save” – that’s it!!  Now head on over to your Glösite to see the fabulousness you’ve just added! If you’ve followed these directions, you’ll now see this:

I, of course, spent an hour playing before I managed to publish this post!